

All right. So you've been stuck inside all winter, with nothing to entertain you but the boob tube and maybe a few games of checkers. Now that it's bright, sunny, and cheerful out, let's make some crafts to celebrate the thawing of our creative juices... let's get 'em flowing!
Many of these crafts involve items that can be found outdoors, from flowers to sticks to the images of animals. Below are some simple craft ideas you can put together to decorate your altar and home.
(If you are creating these crafts with children, please take care that adult supervision is available at all times.)
| via... |
Floral Crowns
Bring out your inner goddess with a wreath of flowers on your head! Whether you make a mini version or a full-out crown for your Beltane ritual, these crowns are sure to hail in the essence of Spring and, of course, fertility. Before taking flowers from the earth (if you're using fresh flowers), be sure to thank the flowering tree or bush for its offering.
You will need:
* green pipe cleaners
* spring flowers, such as azaleas, daffodils, violets, and irises (leave the stems on), either fresh or artificial; and spring herbs, such as ivy and marigold (leave the stems on), either fresh or artificial
* green florist's wire
* ribbons in your preferred spring colors
* bells and other decorations as you see fit
Method:
1. Take a pipe cleaner and wrap it around your head until it fits. (Kids will typically need one, while adults may need two.) Twist the ends to form a ring.
2. With additional pipe cleaners, loop them around the crown until you have a framework to add your flowers.
3. Take your spring flowers and herbs and weave them into the loops. Tuck them in so the frame is covered. If you're having trouble keeping them in, use some green florist's wires to hold them in place. You may also want to use the wire to tie on some bells or other decorations.
4. Cut ribbon to a desired length, and tie them around a small area of the crown.
 |
| via... |
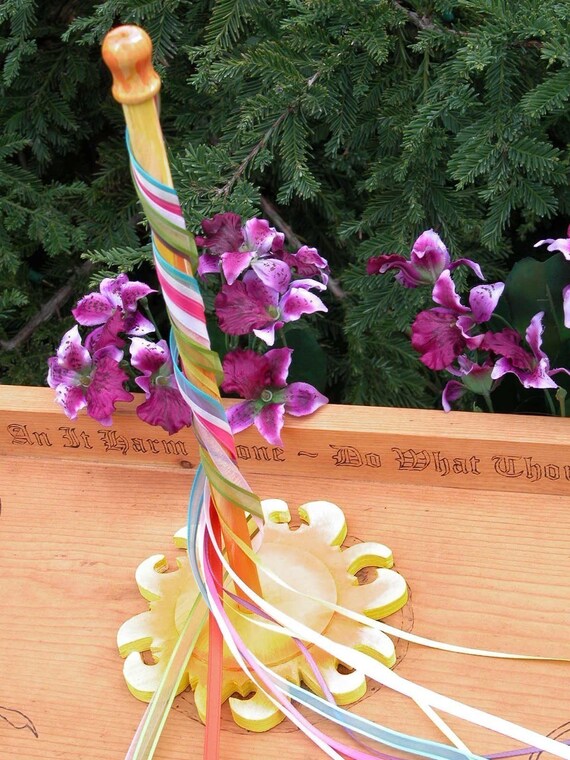
Maypole Altar Centerpiece
This is an easy craft that involves just a few objects, but the color and joy it brings will last all the way through summer! Place this mini maypole in the center of your altar and watch as the ribbons dance about.
You will need:
* a tall object to act as a center pole, about 1' high (Michaels and other craft stores sell dowels that work beautifully)
* a wooden circle
* lengths of ribbon about 1/2" wide, any color(s), a couple inches longer than the pole
* hot glue gun
* miniature floral crown
Method:
1. Using the hot glue gun, glue the dowel to the middle of the wooden circle. Allow to dry. If you desire, you may paint the base of your maypole a myriad Spring colors, plain white, or even stain it.
2.Attach the ribbon to the top of the maypole. If you have a decorative top (as in the picture shown above), you may glue them to the very top. The ribbons will hang down from the point of attachment.
3. Use the maypole as a meditative piece by weaving the ribbons around the pole, or use in ritual.

Faerie Chair
Now THIS, I really want to make! Especially since I plan on turning our backyard into a faerie's and gardener's paradise, having a chair like this would serve as beautiful decor while also housing some fruit-bearing plants... and maybe even a few faeries!
You will need:
* an old wooden or wrought-iron chair
* some primer paint, exterior paint in colors of your choosing, and acrylic paints for creating designs (make them fae-friendly!)
* polyurethane or sealant
* seeds for a climbing flower, like morning glory or clematis, or fruit-bearing plants, like blackberry, passion fruit, and grapes
* a sunny spot in your garden
Method:
1. Apply a coat of primer paint to the chair. White or another light color is the easiest to work with. After the primer has tried, paint on your exterior colors, then use the acrylic paints to decorate the chair with designs. Get creative!
3. Allow this paint to dry, then apply a coat or two of polyurethane to protect the chair from the elements.
4. Find a sunny spot in your garden and loosen the soil a bit. Place the chair where you want it to remain, as it can't be moved after this! Once in place, plant seeds around the base of the chair, just a few inches away from the legs.
5. Tend to your plants according to their care instructions. As the plants appear, twine the vines up through the legs of the chair and around it. If necessary, gently secure them to the chair until they're on their own. Soon enough, you'll have a chair covered in leafy greens and bright flowers. Encourage your children to seek out faeries that might be flitting around!
Beltane Counting Calendar
The anticipation of Beltane could prove to be a strain after a long, harsh winter, especially on children. Much like an Advent calendar, this Beltane calendar can become a popular holiday distraction and give your children a beautiful project to work on while they wait for Spring to arrive once more.
You will need:
* thirty buttons of any shape, size (preferred size is about 1" in diameter), and design
* Velcro, cut into thirty 1/2" to 1" squares (they make this stuff with sticky backs on both sides)
* yellow or white felt (if you're really creative, you could "quilt" one!) measuring 36" x 6"
* ribbons in the color of your choice, cut in one 12" long segment and several 3" long segments
* needle and thread
* a quarter-inch dowel cut 7" long
* white construction paper
* crayons, markers, or other coloring tools
* hot glue gun
* school glue
* school scissors
Method:
1. Take the felt or "quilt" and, using the needle and thread, add loops of 3" ribbon to the top (shorter) side to hold the dowel. Weave the dowel through the ribbon loops. Tie the 12" ribbon to each end of the dowel for hanging.
2. Stick the Velcro squares down the center of the calendar, one on top of the other, leaving as much space as necessary between each. Remove the backing on the other sticky side, and allow your child(ren) to affix the buttons to the Velcro.
3. Using the white construction paper, have your child(ren) draw little images of what they think of when they think of Spring. Have your child(ren) cut out the images and glue them to the calendar with the school glue. Alternately, you may also shop around with them for stickers and other little tchotchkes to affix to the calendar.
4. Take your creation and hang it on the wall! For each day approaching Beltane (starting with 1 April and ending on 1 May), have your child(ren) stick a button on the calendar, starting from the bottom. They may also chant or sing the following while sticking each button up (from Pagan and Wiccan Parenting):
Good Bye Winter,
Good bye Winter,
Good bye Winter,
Good bye Winter,
We wish you’d leave us now.
(replace the following words for “Winter:” snow, slush, snowsuits, cold wind, and any thing else the children come up with.)
Come back Springtime,
Come back Springtime,
Come back Springtime,
We wish you’d come today.
(replace the following words for “Springtime:” green grass, flowers, birds, and any thing else the children come up with.)
Good bye Winter,
Good bye Winter,
Good bye Winter,
We wish you’d leave us now.
(replace the following words for “Winter:” snow, slush, snowsuits, cold wind, and any thing else the children come up with.)
Come back Springtime,
Come back Springtime,
Come back Springtime,
We wish you’d come today.
(replace the following words for “Springtime:” green grass, flowers, birds, and any thing else the children come up with.)

Really enjoyed this site. i cant wait to make an altar m
ReplyDeleteay pole. wish may poles were every where. happy beltane )o( blessed be.
Thank you, Lilith! Good luck with your project, I'm sure it'll be beautiful. :) Blessed Beltane to you!
ReplyDelete